怎么优化图片:
- 图片保存和传输优化:需要压缩图片大小。不同格式占空间大小不同。
- 内存优化(oom):压缩和复用。
文件大小优化
图片保存和传输优化:图片不同的存储格式区别比较多,png、jpeg、webp等。这里不深入文件格式相关内容(下面有一些可以参考地址)。
内存优化
大部分选择fresco 的原因就是因为fresco 在内存方面的优化。可以先了解Android Bitmap 的优化以及解码方式的改进。
Android 不同版本内存优化
- Android 2.2(API level 8) and lower,此时不支持并发GC。2.3增加了并发的GC 机制
- Android 2.3.3(API level 10) and lower,保存在Native 中,拥有很大的内存(相比Java Heap),但是回收不可控,可能导致crash。推荐
Bitmap不使用的时候调用recycle(需要确保Bitmap不再使用了,不然会出错) - Android 3.0(API level 11) and Higher,保存在Java Heap 中,使用
Options.inBitmap复用Bitmap里面的数据。 - 5.0以后GC 机制有修改,虚拟机升级为art。GC 效果提升明显。
Android Bitmap 解码参数介绍
这部分主要是在解码(Bitmap.Config和BitmapFactory.Options)的时候处理,主要分为两部分:压缩和复用。
可以先了解BitmapFactory.Options(下面简称Options)相关的内容。Options相当于是Android 解码图片时的策略。
| 字段 | 含义 | 备注 |
|---|---|---|
| inPreferredConfig | (Config)解码的格式 | 可以参考下面关于Bitmap.Config的表格 |
| inDensity | (int)图片对应像素密度 | api 4引入。可以理解为一张图片对应的dpi(Resource#openRawResource两个参数方法中的TypedValue) |
| inScreenDensity | (int)屏幕实际的像素密度 | api 4引入。可以用来避免将当前处于屏幕密度的位图缩放到兼容性密度。inScreenDensity 和inDensity 相同则不压缩 |
| inTargetDensity | (int)目标像素密度 | api 4引入。可以理解为手机的像素密度。 |
| inScaled | (boolean)为true 并且设置了inDensity、inTargetDensity 会将Bitmpa 压缩到inTargetDensity | api 4引入,默认为true。.9图忽略这个属性。 |
| inPremultiplied | (boolean)为true 则生成的位图的颜色通道将由Alpha通道预先倍增。 | api 19引入,默认为true。 |
| inDither | (boolean)是否开启抖动效果。 | api 24 废弃。 |
| inMutable | (boolean)是否是不可变的Bitmap。 | api 11引入。 |
| inJustDecodeBounds | (boolean)设置为true 那么不会生成Bitmap, 会将图片的大小解析出来保存在 Options.outWidth和Options.outHeight |
一般跟inSampleSize 配合使用 |
| inSampleSize | (int)会对图片的长宽像素缩小到1/n,比如值为2, 那么像素就会减少到1/4 |
一般与inJustDecodeBounds配合使用,<=0时默认是1,并且设置的值会向下取整到2的k次方,比如设置为3,那么最终会是2 |
| inPurgeable | (boolean)为true 则代表会将Bitmap 数据保存的Native 内存中 | api 4引入,api 21 以后废弃。 |
| inInputShareable | (boolean) inPurgeable 为True 才有效。表示是否能共享输入的数据。 | api 4引入,api 21 以后废弃。 |
| inBitmap | (Bitmap)新解码的bitmap 会尝试使用之前bitmap 在heap中所占据的pixel data 内存区域,而不是去问内存重新申请一块区域来存放bitmap | api 11引入。如果inBitmap 是mutable,那么decode 出来的Bitmap 也是mutable。 |
| inPreferQualityOverSpeed | (boolean)设置为true 会使解码成更高质量的图片 | api 24以后废弃。 |
| inTempStorage | 零时存储的数据,用来后续decode | 相当于是一个缓冲 |
| mCancel | (boolean)被另外一个decode 线程取消当前的decode | api 24以后废弃。可能并不会取消掉decode 过程,但返回null。outWidth/outHeight 返回-1 |
| inPreferredColorSpace | (ColorSpace) | api 26 加入 |
| outWidth | (int)解码以后Bitmap 的宽度 | 如果inJustDecodeBounds=true 则是图片的宽度,否则则是处理缩放等以后的宽度 |
| outHeight | (int)解码以后Bitmap 的高度 | 同outWidth 备注 |
| outMimeType | (String)图片解码以后mime | 可能为null |
| outConfig | (Config) | api 26 加入 |
| outColorSpace | (ColorSpace) | api 26 加入 |
上面的表格还可以总结一下:
- Bitmap 压缩
- Bitmap 内存放置位置设置
- Bitmap 复用
- 其他
inDither 介绍。
什么是抖动?开启抖动可以让高质量的图片在低质量的屏幕上还能保持较好的显示效果。比如图片的色彩模式是ARGB8888,但是屏幕的支持的色彩模式是RGB565,开启抖动可以让图片显示不会过于失真。
inMutable 介绍。
什么是可变和不可变?(这个概念没有完全理解)可以从
Drawable#mutate()来看看这个问题。Drawable 设置为mutable 可以保证一个Drawable 的修改不会影响另一个(即两个独立Drable 了)。Bitmap 默认mutable 为false。并且只有Bitmap 为immutable 才可以创建Canvas。所以默认状态Bitmap 的修改会影响多处的Bitmap。(fresco默认设置为true,因为需要后处理)
inPurgeable和inInputShareable优缺点:
decode 出的bitmap 保存在Ashmem 内存中,GC 无法自动回收它。当该Bitmap 在被使用时会被pin 住,使用完之后就unpin ,这样系统就可以在将来某一时间释放这部分内存。如果一个unpinned 的bitmap在之后又要被使用,系统会运行时又将它重新decode,但是这个decode 操作是发生在UI线程中,有可能会造成掉帧现象,因此该做法已经被Google 废弃掉。

inBitmap优缺点:
inBitmap 来告知bitmap 解码器去尝试使用已经存在的内存区域,新解码的bitmap 会尝试去使用之前那张bitmap 在heap 中所占据的pixel data 内存区域,而不是去问内存重新申请一块区域来存放bitmap。利用这种特性,即使是上千张的图片,也只会仅仅只需要占用屏幕所能够显示的图片数量的内存大小。
在SDK 11 -> 18之间,只对JPEG 和PNG 有效并且重用的bitmap 大小必须是一致的,例如给inBitmap 赋值的图片大小为100-100,那么新申请的bitmap 必须也为100-100才能够被重用。从SDK 19开始,新申请的bitmap 大小(一般就是像素数量)必须小于或者等于已经赋值过的bitmap大小。
在SDK 11 -> 18之间,新申请的bitmap 与旧的bitmap 必须有相同的解码格式,例如大家都是8888的,如果前面的bitmap是8888,那么就不能支持4444与565格式的bitmap 了。
Bitmap.Config
| 字段 | 含义 | 备注 |
|---|---|---|
| ALPHA_8 | 1 pixel 只占用1字节 | 适合遮罩 |
| RGB_565 | 1 pixel 占用2字节 | 适合不透明图片压缩 |
| ARGB_4444 | 1 pixel 占用2字节 | API 13 废弃。比较适合保存低品质的像素。但是效果比较差,废弃了 |
| ARGB_8888 | 1 pixel 占用4字节 | 像素保证完好 |
| RGBA_F16 | 1 pixel 只占用8字节 | api 26加入 |
| HARDWARE | 数据保存在graphic memory | api 26加入 |
fresco 解码前优化
这部分的优化不是解码的处理,但是也有一些关系(fresco 里面的注释:We cannot decode from a stream, as that does not support purgeable decodes.)。但是自己用decodeStream 来解析似乎也是可以的,所以这里不是很明白,求赐教。所以这里需要先理解decode 的操作都是decodeByteArray: ArtDecoder 是封装了一个
PooledByteBufferInputStream,KitKatPurgeableDecoder是先将数据copy 到java heap 然后decode,GingerbreadPurgeableDecoder则是先将数据copy 到MemoryFile 然后decode。
fresco 解码图片的时候不是使用BitmapFactory#decodeStream,那么保存这些数据在内存中消耗还是很大。所以fresco 实际上把这些数据保存在了Native 内存中。
简单的时序图:
第8步,实际上最终的操作都是跟Native 交互的。
fresco 封装保存数据在Native 的流的类图: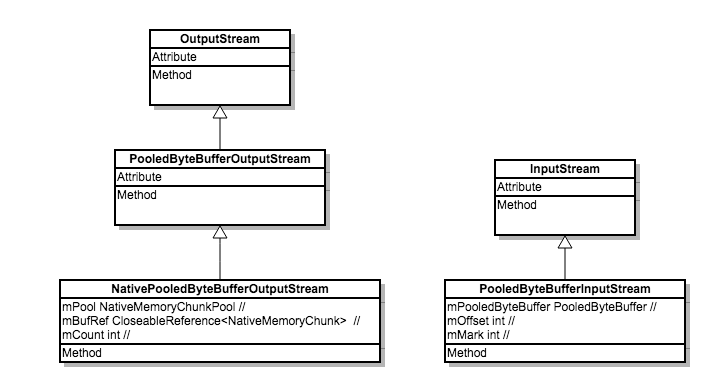
fresco 封装保存数据在Native 的类图: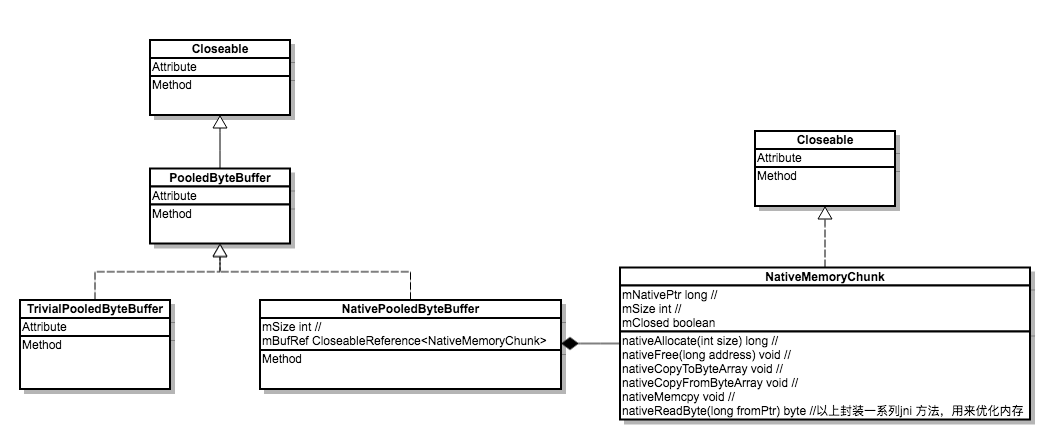
所以代码中使用的PooledByteBuffer实际上是一个NativePooledByteBuffer,保存的是解码前的数据,并且是保存在Native 中。所有于Native 的交互都封装在NativeMemoryChunk。
fresco 解码优化
fresco 对Bitmap 解码优化的原理基于上面方式的改进。fresco 针对不同的Android 版本做的不同优化处理:总体分成ArtDecoder(5.0以后使用art 虚拟机)和DalvikPurgeableDecoder(5.0以前使用Dalvik 虚拟机)。在5.0以前再分成GingerbreadPurgeableDecoder(API 9~18)和KitKatPurgeableDecoder(API 19)。
Java 代码类图如下: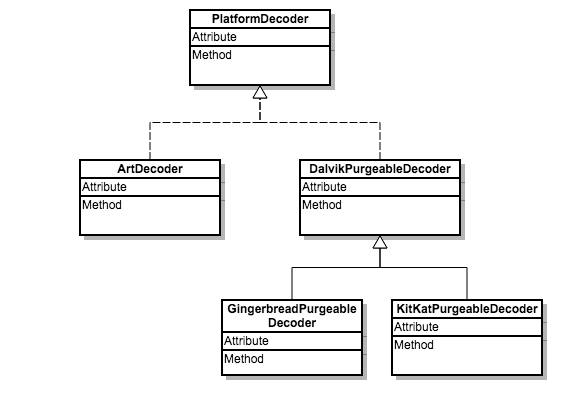
ArtDecoder 优化
获取部分解码配置。
|
|
然后最终解码
|
|
第12行配置了inBitmap 用于复用Bitmap。这里有一个BitmapPool(复用池节点分析)
第17行配置了inTempStorage,相当于是一个缓冲区域。
第20行使用的是BitmapFactory#decodeStream来解码,也没有造成上面分析fresco 解码优化的问题(拷贝未解码数据到java heap 的问题)。
|
|
总结:ArtDecoder 主要是利用了inBitmap 来多内存优化。(为什么不所有的版本都使用inBitmap?上面有介绍缺点)
KitKatPurgeableDecoder 和 GingerbreadPurgeableDecoder优化
api 19以下Options的参数是一样,解码的流程流程也是一样(都是先decode 然后pin)。主要的不同是api 19需要先将未解码的流数据copy 到java heap 以后再解码,而api 11~18则是将数据copy 到MemoryFile再decode。所以两个流程一起看。
|
|
第9行和第11行设置的inPurgeable和inInputShareable。这是Dalvik 解码图片时主要的优化。后面就是分别处理解码操作了。
|
|
第7行和第9行获取到一个保存在Java heap 的byte[] 对象。
第10行,把保存在Native 的流信息拷贝到上面步骤的byte[] 对象中。
第11行,调用BitmapFactory#decodeByteArray解码。
这里的问题需要拷贝数据到byte[] 以后再解码?
因为设置Options#inPurgeable为true 以后是不支持BitmapFactory#decodeStream(上面提到)以及MemoryFile模式(后面GingerbreadPurgeableDecoder会提到)的解码在kitkat 没用。所以综合起来把数据拷贝到Java heap。
拷贝到byte[] 会消耗大量Java Heap 内存是怎么处理的?直接拷贝数据到Java heap 肯定是会占据大量的内存的,同时需要的数量也比较多导致会频繁执行gc,会影响到流畅度。
注意上面第9行代码有一个FlexByteArrayPool对象,这个是用来处理内存复用的(复用池节点分析)。
接下来就是解决inPurgeable的问题(上面已经提到过,会在stopDraw 以后(某个时间点)清除ashmem 内存导致下次draw 的时候重新decode)。主要代码是:DalvikPurgeableDecoder#pinBitmap->Bitmaps#pinBitmap->Bitmaps#nativePinBitmap。最终会调用AndroidBitmap_lockPixels。这样就不会回收stopDraw 的Bitmap 内存。
本来是想验证一下Android 系统是在什么时候去做的unpin 操作的,但是做的demo 体现不了。可以先理解当Bitmap 被使用时会被pin 住,使用完之后就unpin,这样系统就可以在将来某一时间释放这部分内存。
GingerbreadPurgeableDecoder(api 9~18)则是将数据copy 到MemoryFile 然后构造FileDescriptor 最后通过BitmapFactory#decodeFileDescriptor来decode。MemoryFile的学习可以移步老罗的博客Android系统匿名共享内存Ashmem(Anonymous Shared Memory)简要介绍和学习计划。下面代码是将未解码流数据copy 到MemoryFile的流程。
|
|
为什么Dalvik 的优化还要分两部分呢?(The MemoryFile trick used in GingerbreadPurgeableDecoder does not work in KitKat)。
总结:上面的过程是完整的从decode 到pin 的操作。这样的好处就是在api 19以下会把Bitmap 的数据保存在asheme 中(不会保存在Bitmap.mBuffer中),并且是不会在使用的时候回收掉Bitmap 内存。大大的减少了Bitmap 占据的Heap 内存。
复用池
上面在ArtDecoder提到了一个BitmapPool用来提供复用的Bitmap(实际在看代码的时候BitmapPool默认不起作用,每次都是需要createBitmap),在KitKatPurgeableDecoder中提到一个FlexByteArrayPool用来提供byte[]防止decode 时频繁创建byte[]。
fresco 目前提供了3个复用池(还有两个在测试中使用)。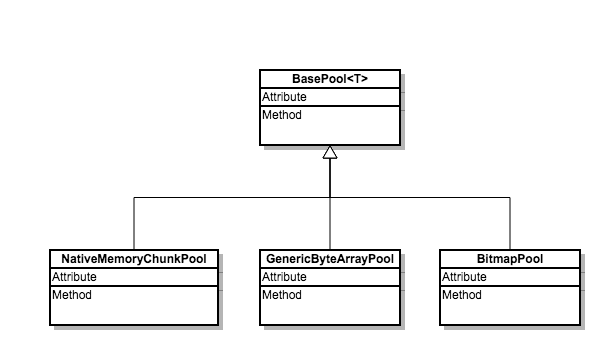
主要分析下FlexByteArrayPool的内容。
首先具体类图。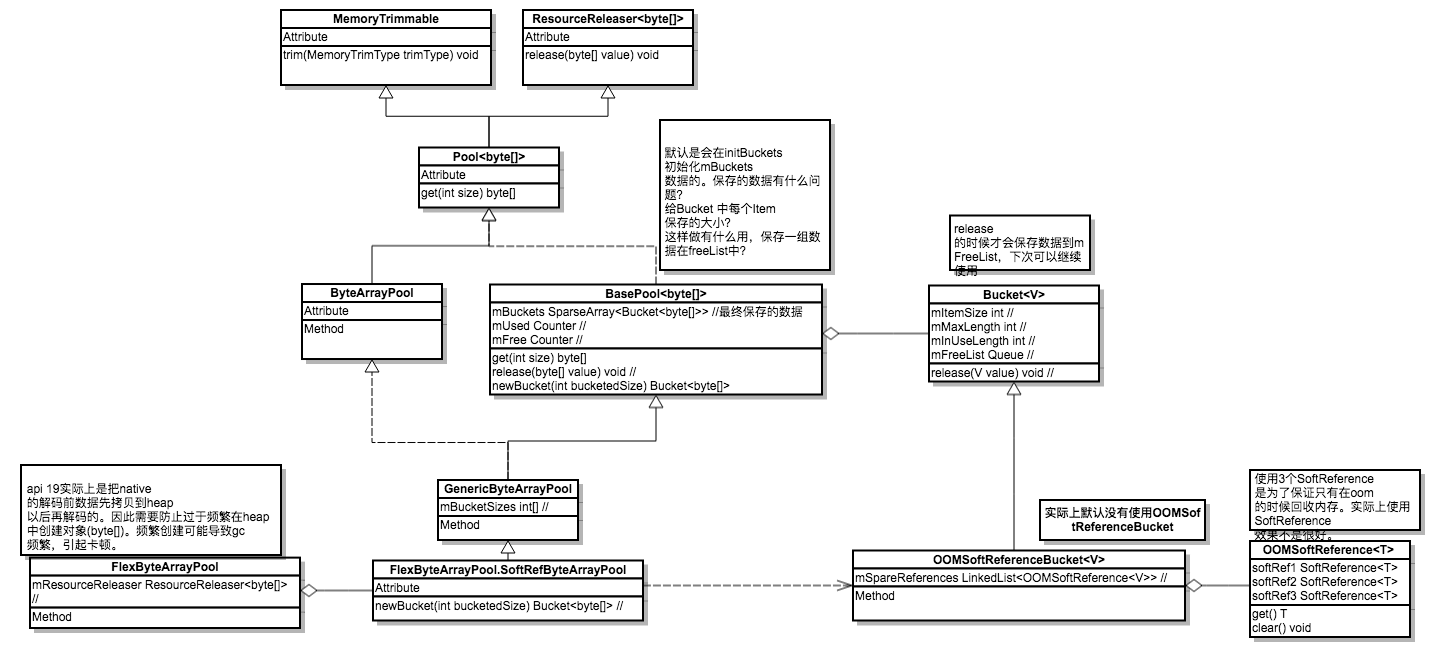
上面KitKatPurgeableDecoder提到的FlexByteArrayPool,具体分析。
使用的时候主要是FlexByteArrayPool#get获取一个复用的byte[],可以仔细的看看BasePool#get逻辑,里面包含了复用池不存在数据时创建的逻辑。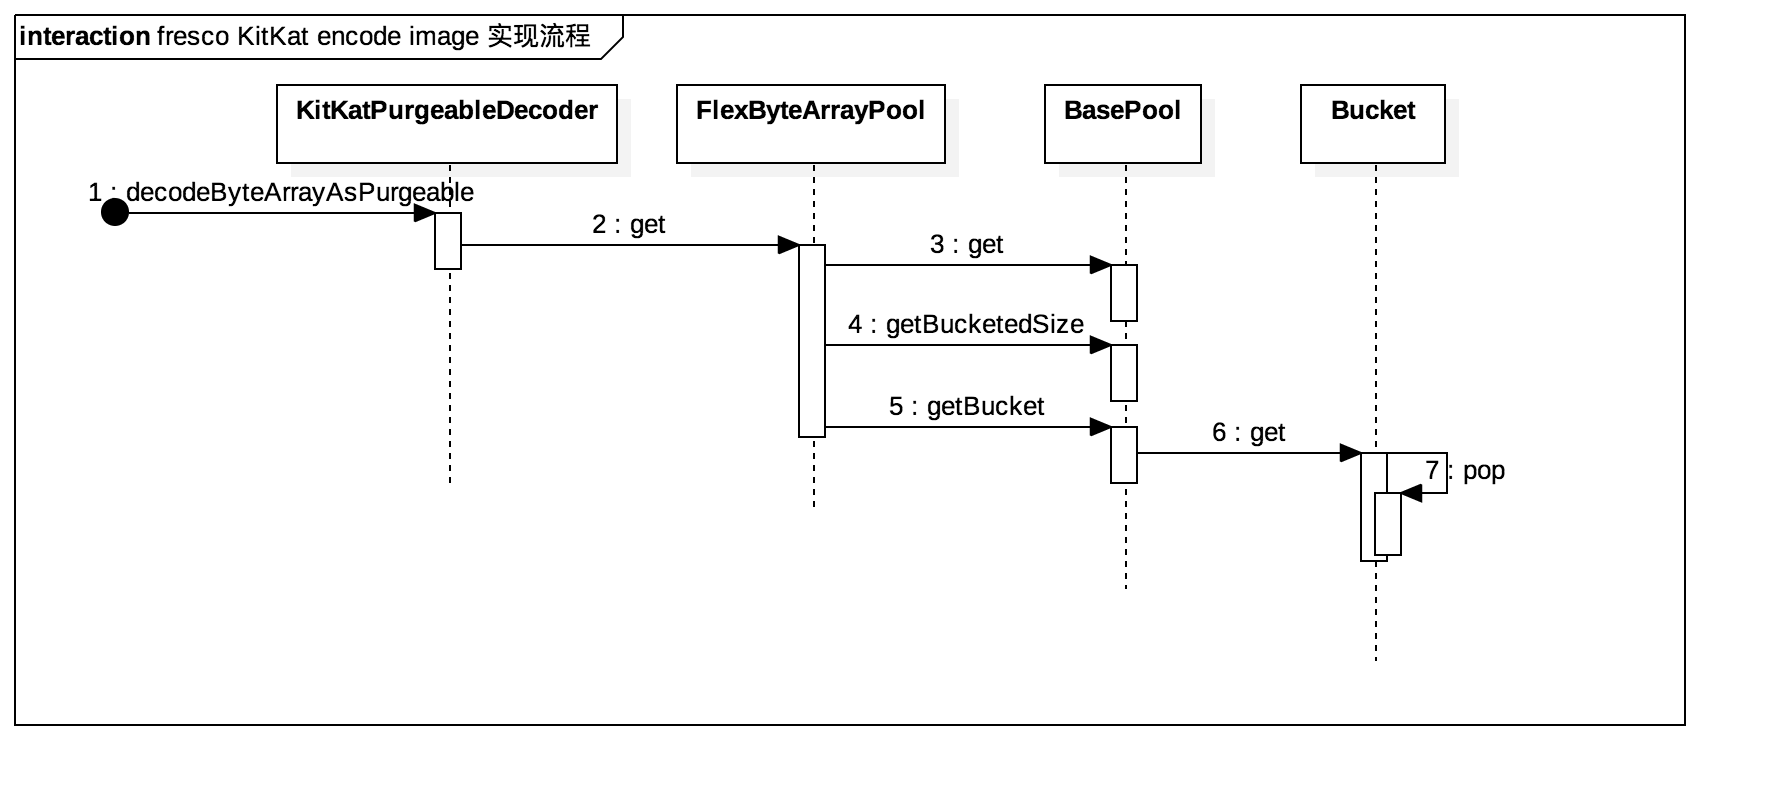
第4步和第5步,默认配置下基本都是可以获取到数据的。主要原因是在BasePool#initBuckets。BasePool#mBuckets在默认情况下是会保存一组数据的。
|
|
那么保存的是什么样的一组数据呢?代码逻辑:
|
|
所以fresco 内部默认已经保存了一组数据(从128k 到4M之间,这里并没有创建byte[] 对象,使用的时候才会创建)。
BasePool保存着一组Bucket在mBuckets(SparseArray<Bucket<V>>,Bucket则是存储着一组数据(mFreeList),key 值代表的是单个数据的长度)。下面是画的一个简图。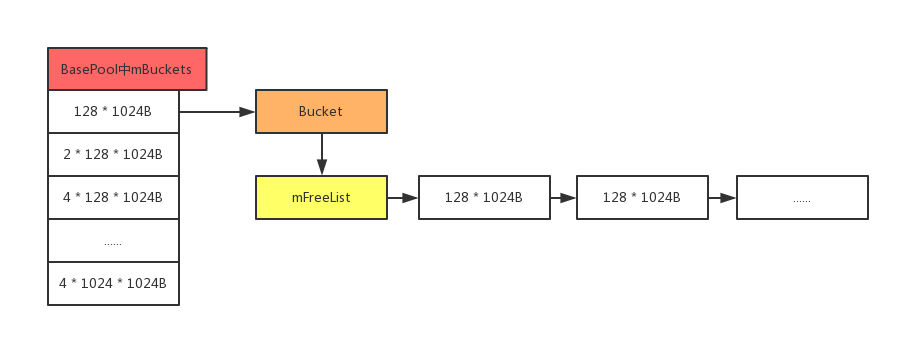
这样下次需要128K 的byte[]时就会直接从mFreeList读取,存在就不会创建新的对象了。(同理其他大小的byte[]也是一样的逻辑)
为什么在实现
GenericByteArrayPool不直接创建一个最大的数组?而是要创建多个不同的呢?为了节省内存。比如创建100 个4M 和创建80个128K 和20个4M 的。
总结:使用复用池减少对象的创建次数。
总结
文章是以前项目介入fresco 之前写的,发现整理起来还是挺费劲的,希望对接入fresco 的你有一些帮助。分析的代码基于fresco 1.5.0。
参考
Android系统匿名共享内存Ashmem(Anonymous Shared Memory)简要介绍和学习计划
Ashmem 讲解
谈谈fresco的bitmap内存分配
Android性能优化典范 - 第2季
Managing Bitmap Memory
glide中似乎提供了多种优化
art vs dalvik
png
webp